 This
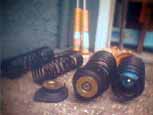
week I got my struts, shocks and springs from Autotech. I opted for
the Bilsteins with the HoR sport springs and a set of German bearing plates
for $625. The Bilstein struts I got were complete units instead of
cartridges. I may be naive, but there are certain things that I did
not take in consideration. The first thing is that, although I would
be receiving the struts as a complete unit, the strut does not have a cartridge
and can not have another cartridge put in it. The struts do have
a lifetime warranty and can be returned to Autotech as a complete unit
for replacement if you keep your receipt. One of the reasons I got
the set this way was so I could have my old set as a back up and not have
to pull it apart, however, I found out that if you order both the struts
and the strut bearing from Autotech, you STILL do not have everything you
need for your front end. You will still need the bearing plate (the
plate that goes between the spring and bearing), some washers and a spacer. This
week I got my struts, shocks and springs from Autotech. I opted for
the Bilsteins with the HoR sport springs and a set of German bearing plates
for $625. The Bilstein struts I got were complete units instead of
cartridges. I may be naive, but there are certain things that I did
not take in consideration. The first thing is that, although I would
be receiving the struts as a complete unit, the strut does not have a cartridge
and can not have another cartridge put in it. The struts do have
a lifetime warranty and can be returned to Autotech as a complete unit
for replacement if you keep your receipt. One of the reasons I got
the set this way was so I could have my old set as a back up and not have
to pull it apart, however, I found out that if you order both the struts
and the strut bearing from Autotech, you STILL do not have everything you
need for your front end. You will still need the bearing plate (the
plate that goes between the spring and bearing), some washers and a spacer.
Once the plate is in place you will be ready for the bearing. The bearing from Autotech is a very nice German one. It's not one of the Brazilian or Mexican ones you may find locally (or even at the dealer!) and will likely last longer than others. Just set the bearing on top of the plate, drop in the spacer (the one you got from your donor strut) and then apply your final washer and top nut. 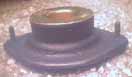 
 When
your strut sandwich is complete, you can zap it with the air gun and proceed
to remove the compression tool. You now have a complete strut unit
ready to hot swap into your bunny in a matter of minutes. I wont
even bother writing the removing and installing of the strut into the car.
That's actually the easiest part. Two bolts on the bottom, two bolts
on top and it's out. I even did the last set with the wheels on,
just to make a point. When
your strut sandwich is complete, you can zap it with the air gun and proceed
to remove the compression tool. You now have a complete strut unit
ready to hot swap into your bunny in a matter of minutes. I wont
even bother writing the removing and installing of the strut into the car.
That's actually the easiest part. Two bolts on the bottom, two bolts
on top and it's out. I even did the last set with the wheels on,
just to make a point.
 PS:
Use caution while drinking and using a strut compressor.... PS:
Use caution while drinking and using a strut compressor.... |
 Here's
a picture of a bearing plate and a spacer we borrowed from a donor set
of 16V struts. The struts were a near useless set we got from DP
Tuning's Going-Out-Of-Business-and-Take-What-You-Want Sale. The cartridges
were blown and the bearings were shot, but the plates, washers and spacers
were good! These parts never really wear, so if you want an extra
set like I have, go to the junkyard and pull some struts. Take the
parts you need, put them back together and return the struts. So
now it seems that I don't have to take my struts apart after all!
The next order of business is to put the new strut into the vise and get
out the ol' strut compressor tool and the air gun. Don't have a strut
compressor? Then you can't get very far. I strongly suggest
getting one. They aren't too expensive, you can probably get one
used and you will likely have friends lined up to use it in the future.
Here's
a picture of a bearing plate and a spacer we borrowed from a donor set
of 16V struts. The struts were a near useless set we got from DP
Tuning's Going-Out-Of-Business-and-Take-What-You-Want Sale. The cartridges
were blown and the bearings were shot, but the plates, washers and spacers
were good! These parts never really wear, so if you want an extra
set like I have, go to the junkyard and pull some struts. Take the
parts you need, put them back together and return the struts. So
now it seems that I don't have to take my struts apart after all!
The next order of business is to put the new strut into the vise and get
out the ol' strut compressor tool and the air gun. Don't have a strut
compressor? Then you can't get very far. I strongly suggest
getting one. They aren't too expensive, you can probably get one
used and you will likely have friends lined up to use it in the future.
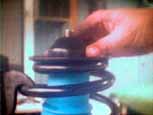
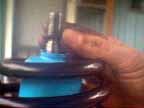 After
the strut is upright in the vise and the spring is placed down over the
piston and the boot (which on the Bilstein is blue as shown in the picture)
is in place, the first part that needs to be installed is a tiny washer
that did not come with the your new parts. As I said above, you'll
need some parts and this small washer is one of them.
After
the strut is upright in the vise and the spring is placed down over the
piston and the boot (which on the Bilstein is blue as shown in the picture)
is in place, the first part that needs to be installed is a tiny washer
that did not come with the your new parts. As I said above, you'll
need some parts and this small washer is one of them.
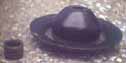
 After
the small washer is in it's place you can put your bearing plate down over
the spring. You'll feel how well your spring feels up against this
plate, another part you won't get new with your kit. If the plate
does not feel snug against the spring, check for compatibility. There
shouldn't
be any difference between different car's bearing plates (that I know of)
but if it doesn't feel right, proceed with caution. As I said, mine
are off of a 16V, but then again you never know! Don't screw around
when your talking about your safety.
After
the small washer is in it's place you can put your bearing plate down over
the spring. You'll feel how well your spring feels up against this
plate, another part you won't get new with your kit. If the plate
does not feel snug against the spring, check for compatibility. There
shouldn't
be any difference between different car's bearing plates (that I know of)
but if it doesn't feel right, proceed with caution. As I said, mine
are off of a 16V, but then again you never know! Don't screw around
when your talking about your safety.
